Computer Vision: Road Lane Detection with OpenCV
IRIS Final Project 1 - Computer Vision & Image Processing
· 2 min read
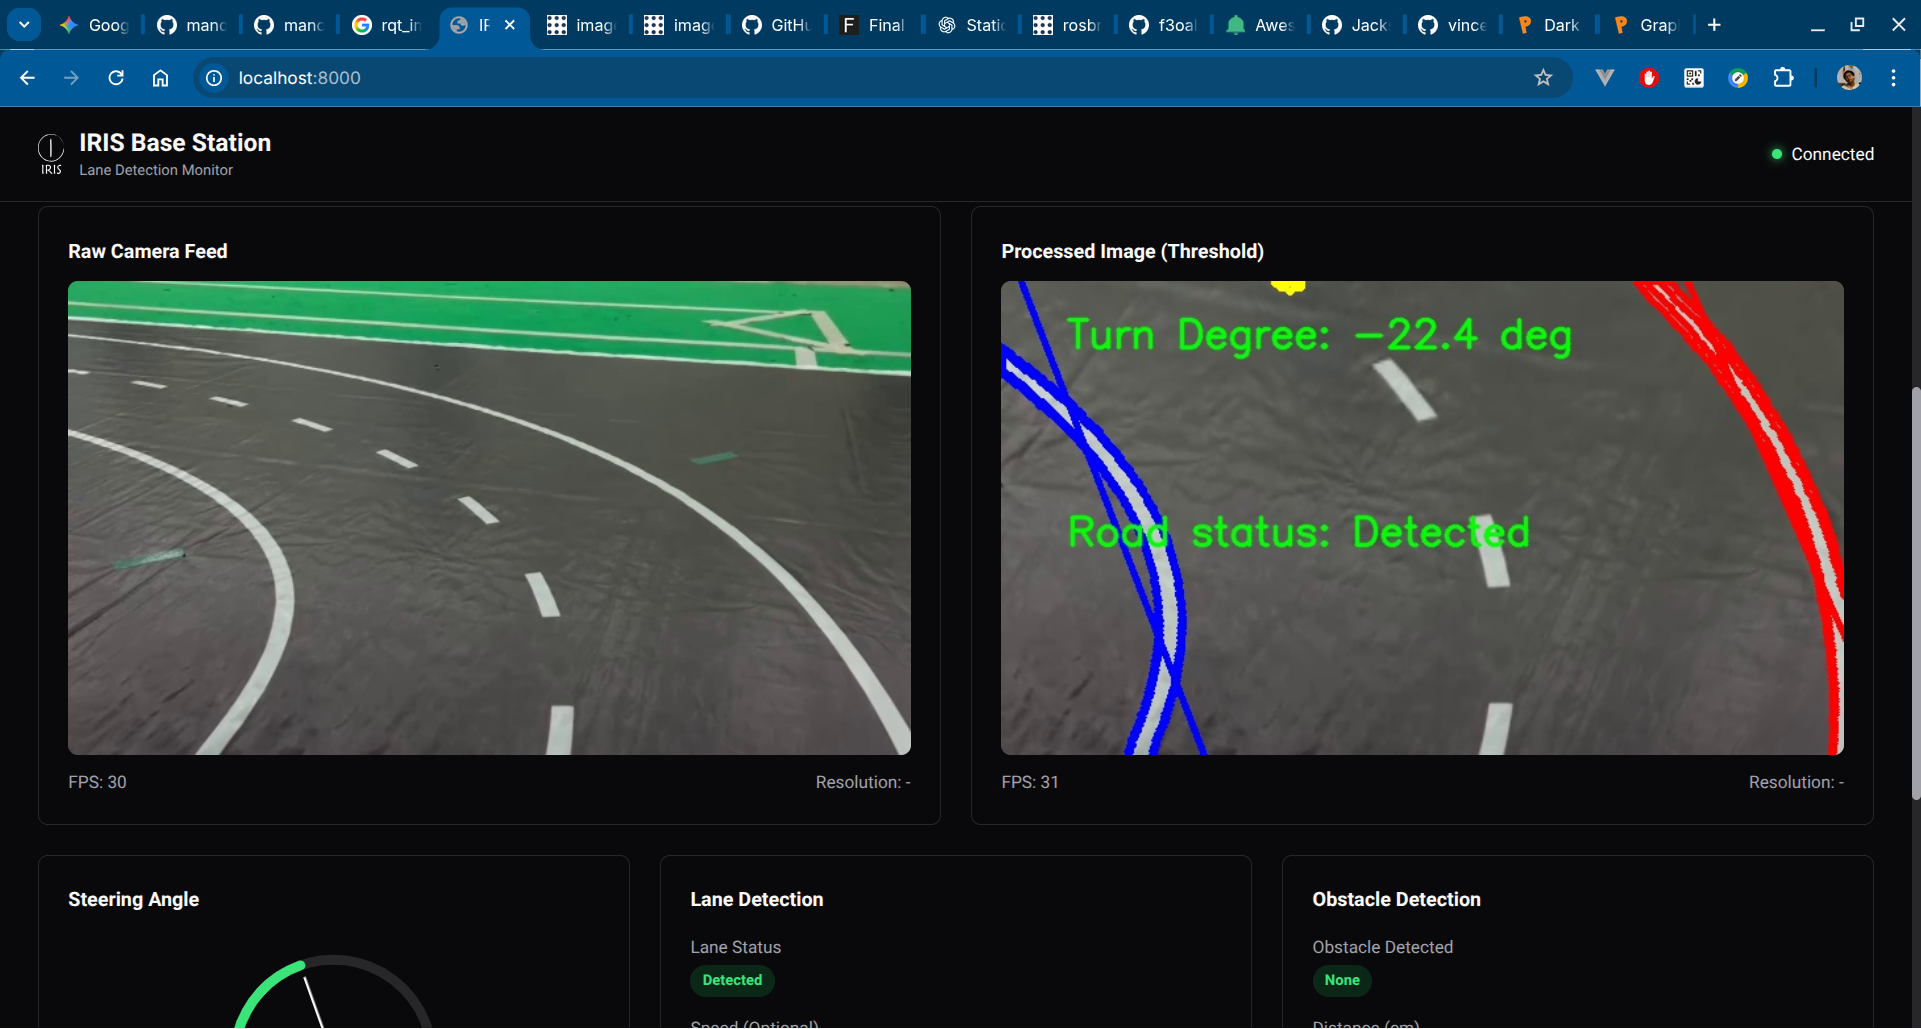
During my internship in IRIS ITS (a robotics team focusing on wheeled, autonomous system), I was tasked to make a road detection & turn degree estimation system based on camera frames. By using OpenCV and some image processing method, this can be achieved with moderate accuracy.
Source Code #
The project is based on ROS workspace.
- GitHub: https://github.com/manoedinata/IRIS-FP1
- Base Station (Web UI dashboard): https://github.com/manoedinata/fp1_bs_iris25
Preparing OpenCV Frame #
First, retrieve the raw image from camera:
// Webcam stream, but camera device / video can also be used
std::string file = "http://10.7.101.143:8080/video";

cv::VideoCapture cap_;
cap_.open(file);

cv::Mat frame;
cap_.read(frame);
if (frame.empty()) {
    RCLCPP_INFO(this->get_logger(), "End of video. Shutting down.");
    rclcpp::shutdown();
    return;
}

// Resize to 640x360
if(frame.cols != 640 || frame.rows != 360)
cv::resize(frame, frame, cv::Size(640, 360));Blur the image to reduce noise:
cv::Mat frame_blurred;
cv::GaussianBlur(frame, frame_blurred, cv::Size(5, 5), 0);Convert to Hue-Saturation-Value (HSV) as well:
cv::Mat hsv;
cv::cvtColor(frame_blurred, hsv, cv::COLOR_BGR2HSV);Road Lane Detection #
To get the road lane from a frame, the base logic is quite simple:
- Outside of the road arena is a field. In IRIS’ laboratory, this is a green-colored field. To get ONLY road arena, simply invert this
- Road arena is outlined
- Combine them, then voila!
// Get road lane by inverting the green color mask
cv::Mat mask, inverted_mask;
cv::Scalar lower_green(33, 50, 50);
cv::Scalar upper_green(85, 255, 255);
cv::inRange(hsv, lower_green, upper_green, mask);
cv::bitwise_not(mask, inverted_mask);

// Get lane lines by converting to grayscale and applying Canny edge detection
cv::Mat gray, edges;
cv::cvtColor(frame_blurred, gray, cv::COLOR_BGR2GRAY);
cv::Canny(gray, edges, 170, 255);

// Combine the inverted green mask and Canny edges
cv::Mat road_lane;
cv::bitwise_and(inverted_mask, edges, road_lane);Changing the POV with Bird’s Eye-View #
To make the detection, we could change the image perspective, as if we’re looking the field from the sky (or drone, or GPS… you know what I mean).

For this, we could implement what’s usually called a Bird’s Eye-View (BEV). Simply put, BEV distorts the image from specified coordinates (points). These points are needed to be set manually and accurately, so that the BEV transformation will be accurate as expected.
// BIRD'S EYE VIEW (BEV)
cv::Point2f top_left(static_cast<float>(width * 0.2), 140.0f);
cv::Point2f top_right(static_cast<float>(width * 0.8), 140.0f);
cv::Point2f bottom_left(0.0f, static_cast<float>(height));
cv::Point2f bottom_right(static_cast<float>(width), static_cast<float>(height));
cv::Point2f src_view[4] = {top_left, top_right, bottom_right, bottom_left};
cv::Point2f dst_view[4] = {
		cv::Point2f(0.0f, 0.0f),
		cv::Point2f(static_cast<float>(width), 0.0f),
		cv::Point2f(static_cast<float>(width), static_cast<float>(height)),
		cv::Point2f(0.0f, static_cast<float>(height))
};

cv::Mat M_perspective = cv::getPerspectiveTransform(src_view, dst_view);

// BEV for Canny (for detection & odometry)
cv::Mat bev_image;
cv::warpPerspective(road_lane, bev_image, M_perspective, cv::Size(width, height));

// BEV on colored image (for visualization)
cv::Mat image_to_bev;
cv::warpPerspective(frame, image_to_bev, M_perspective, cv::Size(width, height));What’s Next? #
To be added!